Saturday 31 December 2011

XPATH in OSB

In this blog I’ll show you some useful XPATH expression in OSB, hope it would reduce lot of searching time if you are new to this subject.To get started I’ll use below XSD in OSB project.

<?xml version="1.0" encoding="windows-1252" ?>
<xsd:schema xmlns:xsd="http://www.w3.org/2001/XMLSchema"
            xmlns="http://www.oracle.com"
            targetNamespace="http://www.oracle.com"
            elementFormDefault="qualified">
  <xsd:element name="PurchaseOrder">
    <xsd:complexType>
      <xsd:sequence>
        <xsd:element name="date" type="xsd:string"/>
        <xsd:element name="custID" type="xsd:string"/>
        <xsd:element name="items">
          <xsd:complexType>
            <xsd:sequence>
              <xsd:element name="item" maxOccurs="unbounded">
                <xsd:complexType>
                  <xsd:sequence>
                    <xsd:element name="description" type="xsd:string"/>
                    <xsd:element name="department" type="xsd:string"/>
                    <xsd:element name="price" type="xsd:float"/>
                    <xsd:element name="quantity" type="xsd:integer"/>
                  </xsd:sequence>
                  <xsd:attribute name="id" type="xsd:string"/>
                </xsd:complexType>
              </xsd:element>
            </xsd:sequence>
          </xsd:complexType>
        </xsd:element>
        <xsd:element name="cardDetails">
          <xsd:complexType>
            <xsd:sequence>
              <xsd:element name="type" type="xsd:string"/>
              <xsd:element name="cardNumber" type="xsd:string"/>
            </xsd:sequence>
          </xsd:complexType>
        </xsd:element>
      </xsd:sequence>
      <xsd:attribute name="id" type="xsd:integer"/>
    </xsd:complexType>
  </xsd:element>
</xsd:schema>
and here is the corresponding xml generated out of that above XSD.

<?xml version="1.0" encoding="UTF-8"?>
<p:PurchaseOrder id="1234" xmlns:p="http://www.oracle.com">
  <p:date>2010-04-02</p:date>
  <p:custID>C7123843</p:custID>
  <p:items>
    <p:item id="GF234324">
      <p:description>Denim Jeans</p:description>
      <p:department>Clothing</p:department>
      <p:price>30.99</p:price>
      <p:quantity>2</p:quantity>
    </p:item>
    <p:item id="HD312782">
      <p:description>iPod 80Gb White</p:description>
      <p:department>Electrical</p:department>
      <p:price>99.99</p:price>
      <p:quantity>1</p:quantity>
    </p:item>
    <p:item id="HD998775">
      <p:description>iPod Headphones</p:description>
      <p:department>Electrical</p:department>
      <p:price>19.99</p:price>
      <p:quantity>1</p:quantity>
    </p:item>
    <p:item id="KD123984">
      <p:description>Frying Pan</p:description>
      <p:department>Home</p:department>
      <p:price>9.99</p:price>
      <p:quantity>1</p:quantity>
    </p:item>
  </p:items>
  <p:cardDetails>
    <p:type>Mastercard</p:type>
    <p:cardNumber>1234-5678-1234-5678</p:cardNumber>
  </p:cardDetails>
</p:PurchaseOrder>

So here are the required scenarios and solution where actual path might be unknown in XML tree .

1.I want to retrieve the node where item id="HD998775.

Solution: $body//*:item[@id='HD998775']

2. I want to retrieve department name of 2nd item node.

Solution: data($body/*:PurchaseOrder/*:items/*:item[2]/*:department)

3.I want to retrieve department name of 4th item node using relative path.

Solution: data($body//*:item[4]/*:department)

So like above you can write any complex XPATH expression.

Sunday 23 October 2011

Search & Replace JDBC Data source in XSLT using ANT

Hey everybody, today I come across a problem while deploying my code using ANT script.Each of my composite has its own deployment plan by which all the endpoint reference and jca properties getting changed to new environment.. but in the XSLT I’ve used couple of query database XPATH function and it use datasource as one of its input parameter.But I didn’t find any option in deployment plan to change the datasource as per my new environment.What if, we have a helper ant script that will search all the xsl files in a directory recursively and work in conjunction with main ant build script, definitely would be good. To get started I created a simple java class who will do the search and replacement job of all xslt files,

package com.shrik.utility;
import org.apache.commons.io.FileUtils;

import java.io.File;
import java.io.FileInputStream;
import java.io.IOException;

import java.util.Collection;
import java.util.Iterator;
import java.util.Properties;
import java.util.regex.Matcher;
import java.util.regex.Pattern;


public class SearchAndReplaceXSLT {
    public static void main(String[] args) throws Exception {
        Properties properties=new Properties();
        properties.load(new FileInputStream("trx.properties"));
       
        File root = new File(properties.getProperty("FileRoot"));
       
        System.out.println(properties.getProperty("FileRoot"));
        String[] extensions = { properties.getProperty("FileExt") };
        boolean recursive = true;

        Collection files = FileUtils.listFiles(root, extensions, recursive);

        for (Iterator iterator = files.iterator(); iterator.hasNext(); ) {
            File file = (File)iterator.next();
            System.out.println("File = " + file.getAbsolutePath());
            SearchAndReplace(file,properties.getProperty("SearchStr"),properties.getProperty("ReplaceStr"));
        }
    }

   private static void SearchAndReplace(File file, String searchStr,
                                         String replaceStr) throws IOException {
        StringBuffer sb=new StringBuffer();
        Pattern pattern=Pattern.compile(searchStr);
        Matcher matcher=pattern.matcher(FileUtils.readFileToString(file));
        while(matcher.find()){
            matcher.appendReplacement(sb, replaceStr);
           
        }
        matcher.appendTail(sb);
        System.out.println(sb.toString());
        FileUtils.writeStringToFile(file,sb.toString() );
    }
}

and here is the corresponding trx.properties file,

FileRoot=C:/shrik/Oracle/SOAWork/composites/DeploymentFramework/test/trx
FileExt=xsl
SearchStr=DS_DEV_YYY&
ReplaceStr=DS_DEV_ZZZ&
build.dir=build
lib.dir=lib
main-class="com.shrik.utility.SearchAndReplaceXSLT"

Do fill up all the values based on your environment and root code repository directory.Just give a test run and check whether its doing your job or not.

Then create a jar file pointing your main class in manifest file.Here we have a dependency on org.apache.commons.io.FileUtils class so I created a folder lib and put the commons-io-1.3.2.jar file under that, here is my directory structure,

image

Under the build folder I created another directory jar , and under that I placed SearchAndReplaceXSLT.jar file.I created a trx folder where I copied all the xsl files, datasource need to be replaced.Now we need to refer the jar file from a ant script and for that I created build.xml file which contains,

<project name="SearchAndReplaceXSLT" basedir="." default="run">

<property file="trx.properties"/> 
    <property name="jar.dir"     value="${build.dir}/jar"/>
    <property name="classes.dir" value="${build.dir}/classes"/>
     <path id="classpath">
        <fileset dir="${lib.dir}" includes="**/*.jar"/>
    </path>
   
    <target name="run" >
        <java fork="true" classname="${main-class}">
            <classpath>
                <path refid="classpath"/>
                <path location="${jar.dir}/${ant.project.name}.jar"/>
            </classpath>
        </java>
    </target>

</project>

Now just run ant and it will do the job .

So next part is how will I call this ant file from main build.xml in deployment script?

In main build.properties file I created a new property trx.amendment=true . Based on this value it will call the child script as below,

<target name="deployAll">
        <if>
          <equals arg1="${trx.amendment}" arg2="true"/>
          <then>
             <ant antfile="${env.CURRENT_FOLDER}/trx.xml" inheritAll="false" target="run"/>
          </then>
      </if>     
       
         <if>
          <equals arg1="${mds.enabled}" arg2="true"/>
          <then>
             <antcall target="deployMDS" inheritall="true"/>
          </then>
      </if>     
      <foreach list="${applications}" param="application" target="deployApplication" inheritall="true" inheritrefs="false"/>
    </target>

So with this you can easily change any data source name in sequence or database query function of your XSLT.

Monday 10 October 2011

Securing a BPEL composite using OEG

In this blog I’ll demonstrate how to secure a SOA composite using Oracle Enterprise Gateway with WS-Header token.At first deploy a simple HelloWorld service.

Follow the link to setup OEG in your system https://docs.google.com/leaf?id=1D0Z0KfgFdvqGHIcpG_7B32mWImGGCRkWhO882KyRVJFYAx94QK9yf6vVTjQP&hl=en

Start enterprise gateway and policy studio.

image

Click on enterprise gateway and edit the active configuration.Password for admin user is blank by default.

image

image

Now in policy tab register your service,

image

image

Select all the default option after that.After successful registration you will get a new generated circuit policy as below,

image

Now create a WS Header authentication policy in your policy library and set it as start.

image

Go to the user tab and create a new user as you given in previous step.

image

Now go back to your generated circuit and edit as below under Request from Client tab.

image

Deploy (F6) your configuration to Gateway.You are done with securing your service , now we’ll test it from service explorer.

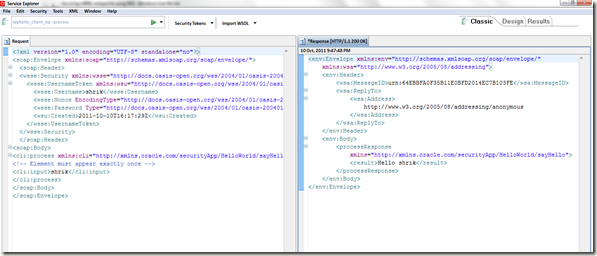
Click on import wsdl and point your service endpoint , change the port to OEG port,

image

Under security token click on WS-Security username token and give the appropriate credentials as below,

image Now test the service and you should get HTTP 200 response.

image

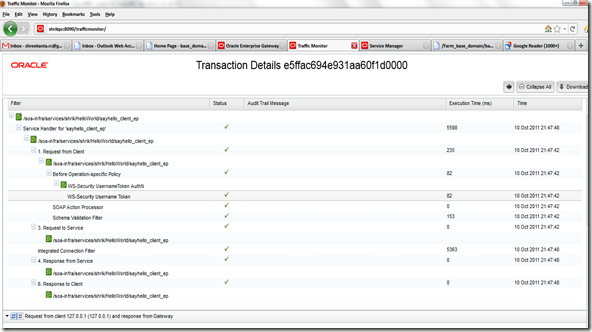
Now login to traffic monitor of OEG and check your request,

image

Monday 5 September 2011

Merge Two Source Element based on a Common Key in XSLT

I had a requirement where I need to merge the contents of two files into a single file and there was a common key between the two schema.We start our process by polling into first file location based on follow schema,

image

Then using synchronous read I’m reading second file whose content is based on below schema,

image

Now after merging I want the content structured as below where CustomerId is common key between two files,

image

and we have to do this merge in xslt , here is the simple code to achieve this,

image 

   <xsl:template match="/">
    <ns0:CustomerInfoFinal>
      <xsl:for-each select="/ns1:CustomerInfo1/ns1:Customer">
        <xsl:variable name="custID" select="ns1:CustomerId"/>
        <ns0:Customer>
          <ns0:CustomerId>
            <xsl:value-of select="ns1:CustomerId"/>
          </ns0:CustomerId>
          <ns0:Name>
            <xsl:value-of select="ns1:Name"/>
          </ns0:Name>
          <ns0:PAN>
            <xsl:value-of select="ns1:PAN"/>
          </ns0:PAN>
          <ns0:Address>
            <xsl:value-of select="$custDetails/ns2:CustomerInfo2/ns2:CustomerOtherInfo[(ns2:CustomerId = $custID)]/ns2:Address"/>
          </ns0:Address>
          <ns0:Age>
            <xsl:value-of select="$custDetails/ns2:CustomerInfo2/ns2:CustomerOtherInfo[(ns2:CustomerId = $custID)]/ns2:Age"/>
          </ns0:Age>
          <ns0:Gender>
            <xsl:value-of select="$custDetails/ns2:CustomerInfo2/ns2:CustomerOtherInfo[(ns2:CustomerId = $custID)]/ns2:Gender"/>
          </ns0:Gender>
        </ns0:Customer>
      </xsl:for-each>
    </ns0:CustomerInfoFinal>
  </xsl:template>

Sunday 4 September 2011

String to Date Conversion in XSLT

This blog might be handy for you for quick date conversion from string to date. Like in our source is String DD-MON-YYYY format and I want to convert it to YYYY-MM-DD for making the JCA adapter recognize the same during updation in oracle table.I didn’t find out any in built function is available so I decided to use simple sql query in xslt.

image

I just used query-database function and sql query is constructed using string concatenation.

image

and if you look at the database function ,

image

and whole sqlquery is concat("select to_char(to_date('",/ns0:arrivalDate,"','DD-MON-YYYY'),'YYYY-MM-DD') arrivalDate from dual")

handy for me as well for future reference.

Thursday 4 August 2011

Error Handling in SOA 11g :Introducing Error Report: Part 3

I would like to ask all the reader to go through my previous two error handling  blog,http://shrikworld.blogspot.com/2011/03/errorhandling-in-soa-11g.html and http://shrikworld.blogspot.com/2011/04/error-handling-in-soa-11g-part-2.html. In previous blog I discussed how to enqueue ECID to your JMS queue from fault policy on any error.So instead of only enqueueing ECID we can also put Fault complete metadata like fault details, composite id etc.You need to modify your custom java code little bit, here is the modified code,

package com.shrik.world.fault;

import com.collaxa.cube.engine.fp.BPELFaultRecoveryContextImpl;

import java.util.Map;
import java.util.UUID;

import oracle.integration.platform.faultpolicy.IFaultRecoveryContext;
import oracle.integration.platform.faultpolicy.IFaultRecoveryJavaClass;

import javax.jms.Connection;
import javax.jms.JMSException;
import javax.jms.MessageProducer;
import javax.jms.Queue;
import javax.jms.QueueConnectionFactory;
import javax.jms.Session;
import javax.jms.TextMessage;

import javax.naming.Context;
import javax.naming.InitialContext;
import javax.naming.NamingException;

import oracle.integration.platform.faulthandling.recovery.RejectedMsgRecoveryContext;

public class CustomFaultHandler implements IFaultRecoveryJavaClass {
  
    Map props;

    public CustomFaultHandler() {
        super();
    }

    public void handleRetrySuccess(IFaultRecoveryContext iFaultRecoveryContext) {
        System.out.println("Retry Success");
        handleFault(iFaultRecoveryContext);
    }

    public String handleFault(IFaultRecoveryContext iFaultRecoveryContext) {
        //Print Fault Meta Data to Console
        System.out.println("****************Fault Metadata********************************");
        System.out.println("Fault policy id: " +
                           iFaultRecoveryContext.getPolicyId());
        System.out.println("Fault type: " + iFaultRecoveryContext.getType());
        System.out.println("Partnerlink: " +
                           iFaultRecoveryContext.getReferenceName());
        System.out.println("Port type: " +
                           iFaultRecoveryContext.getPortType());
        System.out.println("**************************************************************");
        //print all properties defined in the fault-policy file
        System.out.println("Properties Set for the Fault");
        props = iFaultRecoveryContext.getProperties();
        for (Object key : props.keySet()) {
            System.out.println("Key : " + key.toString() + " Value : " +
                               props.get(key).toString());
        }
        //Print Fault Details to Console if it exists
        System.out.println("****************Fault Details********************************");
        BPELFaultRecoveryContextImpl bpelCtx =
            (BPELFaultRecoveryContextImpl)iFaultRecoveryContext;
        if (iFaultRecoveryContext instanceof BPELFaultRecoveryContextImpl) {

            System.out.println("Fault: " + bpelCtx.getFault());
            System.out.println("Activity: " + bpelCtx.getActivityName());
            System.out.println("Composite Instance: " +
                               bpelCtx.getCompositeInstanceId());
            System.out.println("Composite Name: " +
                               bpelCtx.getCompositeName());
            System.out.println("***********************************************************");
        }
        //enqueueing Error Details
        System.out.println("Enqueueing Data into ErrorQ.....");
        try {
            enqueueAqEvent(iFaultRecoveryContext);
        } catch (JMSException e) {
            e.printStackTrace();
        } catch (NamingException e) {
            e.printStackTrace();
        }
        return bpelCtx.getFault().getMessage().contains("env:Server") ? "Terminate":"Manual";
       
    }

    private void enqueueAqEvent(IFaultRecoveryContext iFaultRecoveryContext) throws NamingException,
                                                                                    JMSException {
      
        UUID uuid = UUID.randomUUID();
        Session session = null;
        MessageProducer publisher = null;
        TextMessage message = null;
        InitialContext context = new InitialContext();
        QueueConnectionFactory connectionFactory =(QueueConnectionFactory)context.lookup("error.qcf");
        Connection connection =connectionFactory.createConnection();
        Queue errQueue =(Queue)context.lookup("error.q");
        session =connection.createSession(false, Session.AUTO_ACKNOWLEDGE);
        publisher = session.createProducer(errQueue);
        message =session.createTextMessage(createEventPayload(iFaultRecoveryContext));
        message.setJMSCorrelationID(uuid.toString());
        connection.start();
        publisher.send(message);
        connection.stop();
        connection.close();
    }

    private String createEventPayload(IFaultRecoveryContext iFaultRecoveryContext) {
        String eventPayload =
            "<SOAFault xmlns=\"http://www.shrik.world.com/\">\n" +
            " <ecid>UNKNOWN_ECID</ecid>\n" +
            " <policyID>"+ iFaultRecoveryContext.getPolicyId() + "</policyID>\n" +
            " <type>"+ iFaultRecoveryContext.getType() + "</type>\n" +
            " <partnerLink>"+ iFaultRecoveryContext.getReferenceName() + "</partnerLink>\n" +
            " <port>"+ iFaultRecoveryContext.getPortType() + "</port>\n" +
            " <faultDetails>UNKNOWN_FAULT_DETAILS</faultDetails>\n" +
            " <activity>UNKNOWN_ACTIVITY</activity>\n" +
            " <compositeID>UNKNOWN_INSTANCE_ID</compositeID>\n" +
            " <compositeName>UNKNOWN_COMPOSITE_NAME</compositeName>\n" +
            " <compositeName>UNKNOWN_COMPONENT_NAME</compositeName>\n" +
            "</SOAFault>";

        if (iFaultRecoveryContext instanceof RejectedMsgRecoveryContext) {

            RejectedMsgRecoveryContext rejectedMessageContext =
                (RejectedMsgRecoveryContext)iFaultRecoveryContext;
            String ecid = null;
            if (rejectedMessageContext.getRejectedMessage() != null &&
                rejectedMessageContext.getRejectedMessage().getEcid() !=
                null) {
                ecid = rejectedMessageContext.getRejectedMessage().getEcid();
            } else if (rejectedMessageContext.getFault() != null &&
                       rejectedMessageContext.getFault().getECID() != null) {
                ecid = rejectedMessageContext.getFault().getECID();
            }
            eventPayload = eventPayload.replace("UNKNOWN_ECID", ecid);
        } else if (iFaultRecoveryContext instanceof
                   BPELFaultRecoveryContextImpl) {
            BPELFaultRecoveryContextImpl bpelFaultRecoveryContextImpl =
                (BPELFaultRecoveryContextImpl)iFaultRecoveryContext;
       
            eventPayload =eventPayload.replace("UNKNOWN_ECID", bpelFaultRecoveryContextImpl.getECID());
            eventPayload =eventPayload.replace("UNKNOWN_FAULT_DETAILS", bpelFaultRecoveryContextImpl.getFault().getMessage());
            eventPayload =eventPayload.replace("UNKNOWN_ACTIVITY", bpelFaultRecoveryContextImpl.getActivityName());
            eventPayload =eventPayload.replace("UNKNOWN_INSTANCE_ID", bpelFaultRecoveryContextImpl.getComponentInstanceId());
            eventPayload =eventPayload.replace("UNKNOWN_COMPOSITE_NAME", bpelFaultRecoveryContextImpl.getCompositeName());
            eventPayload =eventPayload.replace("UNKNOWN_COMPONENT_NAME", bpelFaultRecoveryContextImpl.getComponentName());
        }
        System.out.println(eventPayload);
        return eventPayload;
    }
}

So whenever any error occur at composite the below message will be put into the queue

image

<SOAFault xmlns="http://www.shrik.world.com/">
<ecid>11d1def534ea1be0:1ba57489:13197ef8107:-8000-0000000000000347</ecid>
<policyID>CompositeFaultPolicy</policyID>
<type>bpel</type>
<partnerLink>Service1</partnerLink>
<port>{
http://xmlns.oracle.com/ErrorHandlingApp/HelloWorld/sayHello}sayHello</port>
<faultDetails>faultName: {{
http://schemas.oracle.com/bpel/extension}remoteFault}
messageType: {{http://schemas.oracle.com/bpel/extension}RuntimeFaultMessage}
parts: {{
summary=<summary>Message Router for shrik/HelloWorld!1.0*soa_a94e595b-965e-48d9-8b15-6735c29a2805 is not able to process messages. The composite state is set to "off".  The composite can be turned "on" by using the administrative consoles.</summary>
,detail=<detail>&lt;exception>Message Router for shrik/HelloWorld!1.0*soa_a94e595b-965e-48d9-8b15-6735c29a2805 is not able to process messages. The composite state is set to "off".  The composite can be turned "on" by using the administrative consoles.&lt;/exception>
</detail>
,code=<code>env:Server</code>}
</faultDetails>
<activity>Invoke1</activity>
<compositeID>bpel:260001</compositeID>
<compositeName>CallHelloWorld</compositeName>
<compositeName>BPELProcess1</compositeName>
</SOAFault>

Now we can have a composite say SOAErrorNotificationProcess to dequeue the data from this error queue and send notification to concerned group along with auditing the same.Here is the design of that composite,

image

Its pretty simple and for auditing purpose I created below table in soainfra.database to store the error details,here is the DDL and sample data,

CREATE TABLE "DEV_SOAINFRA"."XX_COMPOSITE_ERRORS"
  (
    "ECID"           VARCHAR2(1000 BYTE) NOT NULL ENABLE,
    "POLICY_ID"      VARCHAR2(100 BYTE),
    "TYPE"           VARCHAR2(20 BYTE),
    "PARTNERLINK"    VARCHAR2(50 BYTE),
    "PORT"           VARCHAR2(500 BYTE),
    "FAULT_SUMMARY"  VARCHAR2(1000 BYTE),
    "FAULT_DETAILS"  VARCHAR2(1000 BYTE),
    "FAULT_CODE"     VARCHAR2(100 BYTE),
    "ACTIVITY"       VARCHAR2(20 BYTE),
    "COMPOSITE_ID"   VARCHAR2(100 BYTE),
    "COMPOSITE_NAME" VARCHAR2(1000 BYTE),
    "ERROR_TIME" DATE,
    CONSTRAINT "XX_COMPOSITE_ERRORS_PK" PRIMARY KEY ("ECID") USING INDEX PCTFREE 10 INITRANS 2 MAXTRANS 255 COMPUTE STATISTICS STORAGE(INITIAL 65536 NEXT 1048576 MINEXTENTS 1 MAXEXTENTS 2147483645 PCTINCREASE 0 FREELISTS 1 FREELIST GROUPS 1 BUFFER_POOL DEFAULT FLASH_CACHE DEFAULT CELL_FLASH_CACHE DEFAULT) TABLESPACE "DEV_SOAINFRA" ENABLE
  )
  SEGMENT CREATION IMMEDIATE PCTFREE 10 PCTUSED 40 INITRANS 1 MAXTRANS 255 NOCOMPRESS LOGGING STORAGE
  (
    INITIAL 65536 NEXT 1048576 MINEXTENTS 1 MAXEXTENTS 2147483645 PCTINCREASE 0 FREELISTS 1 FREELIST GROUPS 1 BUFFER_POOL DEFAULT FLASH_CACHE DEFAULT CELL_FLASH_CACHE DEFAULT
  )
  TABLESPACE "DEV_SOAINFRA" ;

Make the routing parallel in mediator so that u can incorporate your custom fault policy there,

image

I’m not going into more details of this composite.Now just make one process faulted and our custom framework will do the following things sequentially,

1.It parse the custom policy file.2.It retrieves the fault metadata and details from em 3.It enqueue all the details to error queue. 4.SOAErrorNotificationProcess will keep on polling that queue and as soon as a data comes into error queue it retrieves that.5.It audit all the error details into a table as well as send email to a group with all fault details.

Now what's next? you can see all the faulted instances for manual recovery.Now can’t we have a report by which we can see all the error details , all the recoverable instance and retry or abort from there itself instead of going to em.Even that report would be useful for business users to get a bird’s eye view.

I used ADF here for creating the report.To get started create a view(using entity) based on the error table that you created in soainfra like below,

image

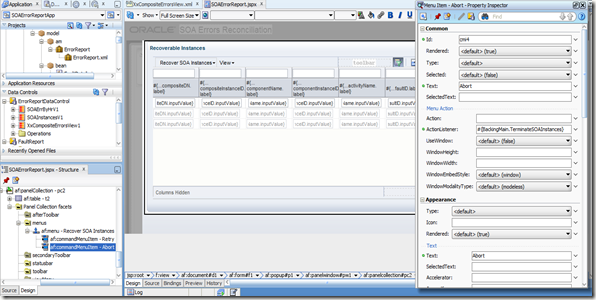
Register you vo to am to make it accessible to your report as a datasource.Create a page and drag drop your data source as a ADF Query panel. Here is the UI of mine,

image

In the menu I just incorporated print page and export as a excel functionality,

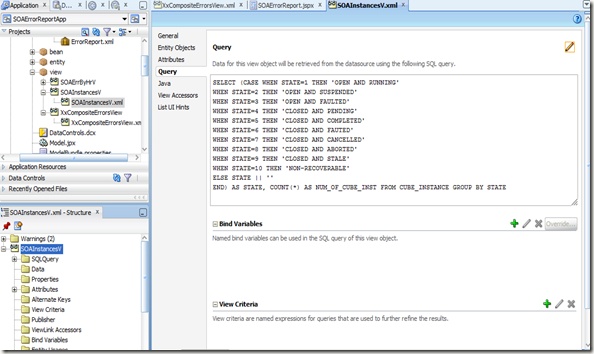
There is a button Instance Statistics in toolbar which bound to adf popup. Data source for popup is different and sql query based,here is the query

SELECT (CASE WHEN STATE=1 THEN 'OPEN AND RUNNING'
WHEN STATE=2 THEN 'OPEN AND SUSPENDED'
WHEN STATE=3 THEN 'OPEN AND FAULTED'
WHEN STATE=4 THEN 'CLOSED AND PENDING'
WHEN STATE=5 THEN 'CLOSED AND COMPLETED'
WHEN STATE=6 THEN 'CLOSED AND FAUTED'
WHEN STATE=7 THEN 'CLOSED AND CANCELLED'
WHEN STATE=8 THEN 'CLOSED AND ABORTED'
WHEN STATE=9 THEN 'CLOSED AND STALE'
WHEN STATE=10 THEN 'NON-RECOVERABLE'
ELSE STATE || ''
END) AS STATE, COUNT(*) AS NUM_OF_CUBE_INST FROM CUBE_INSTANCE GROUP BY STATE
image

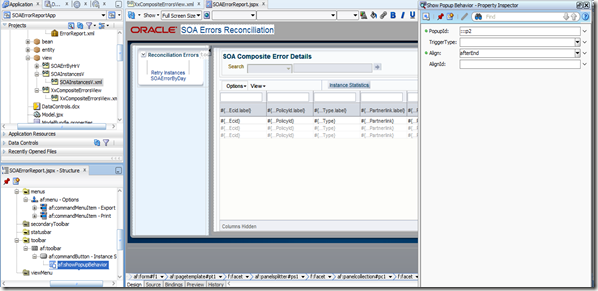
Register your view to am.Now create a popup and bind the popup id to your command button popup behaviour.
image

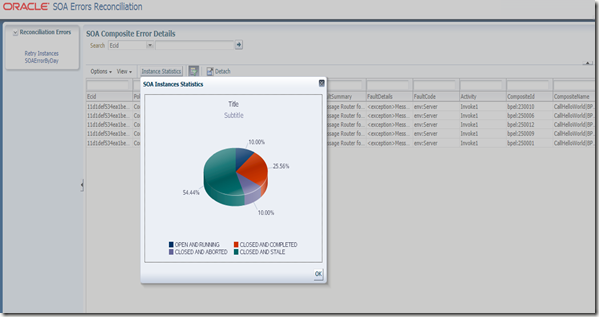
Now create a pie chart based on SOAInstancesV as below in your popup,

image

Now just run the page to check the added functionality,Run the query and click on command button on toolbar.

image

image

Now we need to build left hand navigation.There are two links with popup behaviour, RetryInstances and SOAErrorByDay.

In RetryInstances it will popup all the recoverable instances from soa mbean that went to manual intervention in em and there would be option for retry or terminate instances without login into em.     The underlying datasource for retryinstances is based on Java bean.First create below classes in your model,

FaultDetails.java it basically contains all the getter and setter method that will be used later as a table.

package com.shrik.world.model.bean;

public class FaultDetails {

    private String compositeDN;
    private String compositeInstanceID;
    private String componentName;
    private String componentInstanceID;
    private String activityName;
    private String faultID;
    private String faultName;
    private boolean recoverableFlag;
    private String faultMessage;

    public FaultDetails() {
        super();
    }

    public FaultDetails(String compositeDN, String compositeInstanceID, String componentName, String componentInstanceID,
                 String activityName, String faultID, String faultName,boolean recoverableFlag,String faultMessage) {
        this.compositeDN=compositeDN;
        this.compositeInstanceID=compositeInstanceID;
        this.componentName=componentName;
        this.componentInstanceID=componentInstanceID;
        this.activityName=activityName;
        this.faultID=faultID;
        this.faultName=faultName;
        this.recoverableFlag=recoverableFlag;
        this.faultMessage=faultMessage;
    }


    public void setCompositeDN(String compositeDN) {
        this.compositeDN = compositeDN;
    }

    public String getCompositeDN() {
        return compositeDN;
    }

    public void setCompositeInstanceID(String compositeInstanceID) {
        this.compositeInstanceID = compositeInstanceID;
    }

    public String getCompositeInstanceID() {
        return compositeInstanceID;
    }

    public void setComponentName(String componentName) {
        this.componentName = componentName;
    }

    public String getComponentName() {
        return componentName;
    }

    public void setComponentInstanceID(String componentInstanceID) {
        this.componentInstanceID = componentInstanceID;
    }

    public String getComponentInstanceID() {
        return componentInstanceID;
    }

    public void setActivityName(String activityName) {
        this.activityName = activityName;
    }

    public String getActivityName() {
        return activityName;
    }

    public void setFaultID(String faultID) {
        this.faultID = faultID;
    }

    public String getFaultID() {
        return faultID;
    }

    public void setFaultName(String faultName) {
        this.faultName = faultName;
    }

    public String getFaultName() {
        return faultName;
    }


    public void setFaultMessage(String faultMessage) {
        this.faultMessage = faultMessage;
    }

    public String getFaultMessage() {
        return faultMessage;
    }

    public void setRecoverableFlag(boolean recoverableFlag) {
        this.recoverableFlag = recoverableFlag;
    }

    public boolean isRecoverableFlag() {
        return recoverableFlag;
    }
}

FaultReport.java that populates FaultDetails with all required information,

package com.shrik.world.model.bean;

import java.util.ArrayList;
import java.util.Hashtable;

import java.util.List;

import javax.naming.Context;

import oracle.soa.management.facade.Fault;
import oracle.soa.management.facade.FaultRecoveryActionTypeConstants;
import oracle.soa.management.facade.Locator;
import oracle.soa.management.facade.LocatorFactory;
import oracle.soa.management.facade.bpel.BPELServiceEngine;
import oracle.soa.management.util.FaultFilter;

public class FaultReport {
    private Locator locator = null;
    private BPELServiceEngine mBPELServiceEngine;
    private List<Fault> faultList;
    private List<FaultDetails> myfaults = new ArrayList();

    public List<FaultDetails> findAllRecoverableFaults() {
        return myfaults;
    }

    public FaultReport() {
        locator = this.getLocator();
        try {
            mBPELServiceEngine = (BPELServiceEngine)locator.getServiceEngine(Locator.SE_BPEL);

            FaultFilter filter = new FaultFilter();
            filter.setFaultName("{http://schemas.oracle.com/bpel/extension}remoteFault");
            filter.setRecoverable(true);

            //Get faults using defined filter
            faultList = mBPELServiceEngine.getFaults(filter);
            for (Fault fault : faultList) {
                myfaults.add(new FaultDetails(
                                                fault.getCompositeDN().getStringDN(),
                                                fault.getCompositeInstanceId(),
                                                fault.getComponentName(),
                                                fault.getComponentInstanceId(),
                                                fault.getLabel(),
                                                fault.getId(),
                                                fault.getName().toString(),
                                                fault.isRecoverable(),
                                                fault.getMessage().toString()));
            }

        } catch (Exception e) {
            e.printStackTrace();
        }
    }


    public Locator getLocator() {

        try {
            return LocatorFactory.createLocator(getJndiProps());
        } catch (Exception e) {
            e.printStackTrace();
        }
        return null;
    }

    public Hashtable getJndiProps() {
        Hashtable jndiProps = new Hashtable();
        jndiProps.put(Context.PROVIDER_URL, "t3://localhost:8001/soa-infra");
        jndiProps.put(Context.INITIAL_CONTEXT_FACTORY, "weblogic.jndi.WLInitialContextFactory");
        jndiProps.put(Context.SECURITY_PRINCIPAL, "weblogic");
        jndiProps.put(Context.SECURITY_CREDENTIALS, "welcome1");
        jndiProps.put("dedicated.connection", "true");
        return jndiProps;
    }
   
    public void retryRecoverableInstances(){
        try {
            mBPELServiceEngine.recoverFaults(faultList.toArray(new Fault[faultList.size()]), FaultRecoveryActionTypeConstants.ACTION_RETRY);
        } catch (Exception e) {
            e.printStackTrace();
        }
    }
   
    public void terminateRecoverableInstances(){
        try {
            mBPELServiceEngine.recoverFaults(faultList.toArray(new Fault[faultList.size()]), FaultRecoveryActionTypeConstants.ACTION_ABORT);
        } catch (Exception e) {
            e.printStackTrace();
        }
    }

}
Here you can retrieve the server properties from external file as well instead of hardcoding.

Now right click on FaultReport and generate the data source.After sometime you should be able to see the datasource,
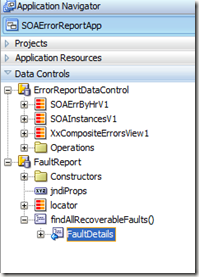
image

Now in the popup drag drop that datasource in a panel collection as below,
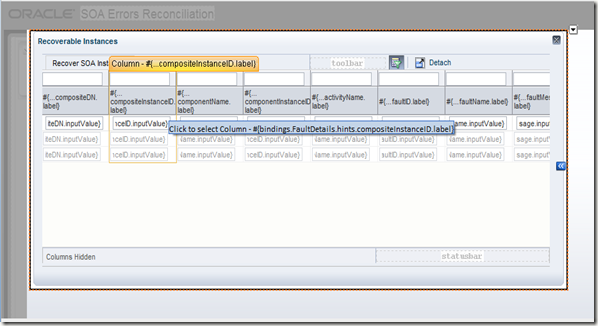
image

In the menu I added two options,Retry and Abort and here is the action listener binding

image

image

Methods are written as below,

package com.shrik.world.bean;
import  com.shrik.world.model.bean.FaultReport;

import javax.faces.event.ActionEvent;

public class Reconcile {
    public Reconcile() {
    }

    public void RetrySOARecoverable(ActionEvent actionEvent) {
       new FaultReport().retryRecoverableInstances();
      
    }

    public void TerminateSOAInstances(ActionEvent actionEvent) {
        new FaultReport().terminateRecoverableInstances();
    }

   
}
Now to get error details per day just create a SQL query based vo and register to am as below,
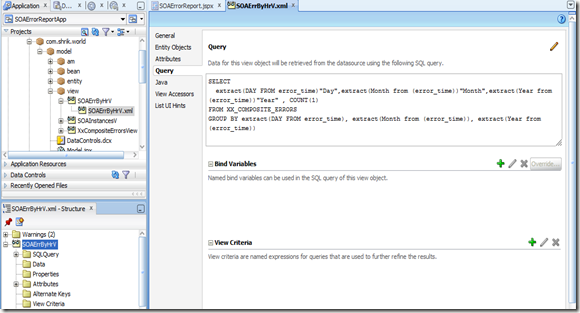
image

Now create a bar chart in popup window as below,
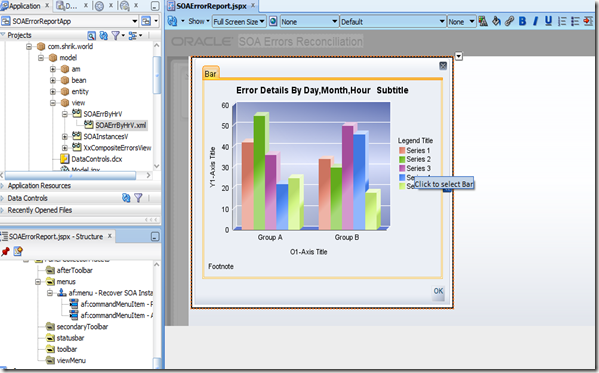
image

Now run the page and click on RetryInstances in left navigator,check the Retry and Abort functionality and verify the same from em console.
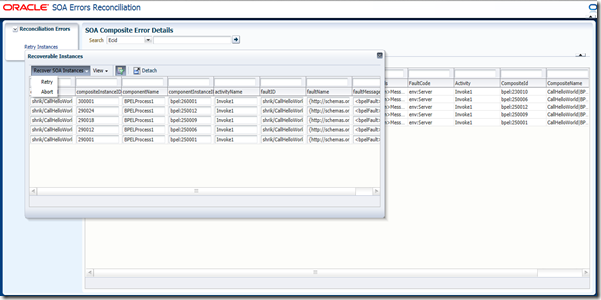
image

Now click on SOAErrorByDay and a bar chart would popup as below,
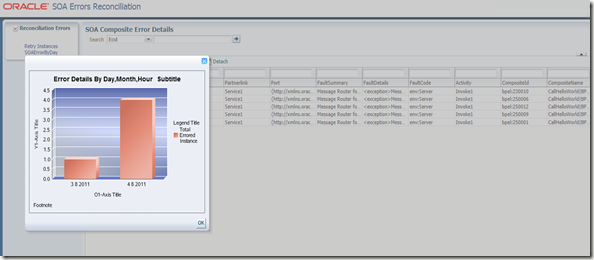
image

Now you can wrap up the whole code into a EAR and deploy that to em.You can customize your GUI as per your need.

Friday 22 July 2011

Securing SOA 11g Environment

Security is the most important part of any enterprise application. So we need to secure SOA Production environment secure and make Jdeveloper communicate with that secure environment.

In this blog I’ll show you how to import certificate into weblogic and jdev and make it accessible over https.You can take the certificate from any trusted CA but that incur some extra expense.For testing and development purpose you can use self signed certificate else you can download the signed certificate from a CA which is free of cost, will show you the link in steps later.So prerequisite is your SOA 11.1.1.5 env is ready with Admin server which contains SOA managed server, just follow the steps and you are done!

At first open a command prompt and set exactly the same JAVA_HOME which your weblogic server is using.For that just run <fmw_home>\user_projects\domains\base_domain\bin\setDomainEnv.sh or setDomainEnv.cmd. Check the java –version to recheck once again and issue the below commands.In all cases you can use your own alias name and keystore name.I created my own certificates directory(can be at any location) and change the path to the same.

1. Generate Private Key pair using keytool

keytool -genkeypair -alias myserver -keyalg RSA -keysize 2048 -validity 365 -keystore shrikIS.jks -storepass welcome1

During key pair generation it will ask for some details onscreen and provide the same as per your wish.But for Prod environment your prod server URL would be the CN value.You can go ahead with any arbitrary value for testing purpose,after this command you can find shrikIS.jks created.

2. Generate CSR to be submitted to CA

keytool -certreq -v -alias myserver -file serverCert.csr -keypass welcome1 -storepass welcome1 -keystore shrikIS.jks

after this command you will find serverCert.csr file created in your directory.Just open that in notepad and copy the content like below sample,

-----BEGIN NEW CERTIFICATE REQUEST-----
MIICtTCCAZ0CAQAwcDELMAkGA1UEBhMCSU4xCzAJBgNVBAgTAkhSMRAwDgYDVQQHEwdHdXJnYW9u
MRMwEQYDVQQKEwpzaHJpa3dvcmxkMQswCQYDVQQLEwJJVDEgMB4GA1UEAxMXU2hyZWVrYW50YSBS
b3ljaG93ZGh1cnkwggEiMA0GCSqGSIb3DQEBAQUAA4IBDwAwggEKAoIBAQCrurewhMtAxY/BGRPn
sWQANSIFqIprGDaCOz/YH3XAcUguPg7lUTkE8o6tRfT6vMrMSai2/zg8Cc9dwbNaTtRoJu15qAHq
6Ta6SjvQ4VeIwAP8T2BNnrHn+GQuo7E0ef0hNHuvVcsLoZy6dBlXIc/WBn869xUKt84+ZZ79cII8
VenWFvJXi1f8NxitkjKRzbOydFOVwOza8Lo90V7Tn/DkV2OHpL9bjLnWJhLT5ZGwxhnqne79tJbV
VTZepndjhuz0JEc4DjjS2TZqsT7q4zdXM0+5HwJDOxvqjEegfSewfwPlXGSLHhOSA1s6fsEQtmZ9
h7IGSC5TJQnoXyOyxz4lAgMBAAGgADANBgkqhkiG9w0BAQUFAAOCAQEAVbIrPKGA5d6CPzXfB50S
GE4c/1OAH+qx+cv0ZzulgnfuPdKaVWzqJDc13UquCBjl/8fKevASgTtmw420JVZX6teOiCUtH06n
tO1EIT/Ti53D5KIDCQhRosMl54OjBzYwfejTDXbjoOHtKHzQo9Wi8W5sl4dd5jAp1BP/PBbfxaBS
LLPbzSRxcQKTszpeE6ekFSaKzll1CnuBhCydjXMOf6rKFOD7s1vT5uN4+GFRjtXGUlzYqcKfCTgj
OBS/MfSru4IIZtweyXJUhGPCvLaVWyq0VQ+3x4TLXDrw1579MtDunuTaJiysk1bRc1Tjrhy/hmlP
txsGAdmwrduApovnHA==
-----END NEW CERTIFICATE REQUEST-----

You need to send this CSR to a CA who will give you root certificate,sometimes intermediate certificate and signed certificate(public key).Go to http://www.getacert.com/signacert.html.

image

So here in the blank section copy paste your CSR content and click submit. After that you reach the below screen,

image

From this screen download all two .cer files in same directory.

3. Import the getacert.cer file as RootCert as below,

keytool -import  -file getacert.cer -alias RootCA -keystore shrikIS.jks -storepass welcome1

4. Establish Certificates Chain

Then you have to import the ShreekantaRoychowdhury-2011-07-21-214305.cer file , but remember here you have to give same alias name as you given while generating the private key pair at first step, to establish the certificate chain.

keytool -import  -file ShreekantaRoychowdhury-2011-07-21-214305.cer -alias myserver -keystore shrikIS.jks -storepass welcome1

You should see ‘Certificate reply was installed in keystore’ message after executing the above command.

5. Create Trust Store

Now export the public key of your certificate and store it in a trust store by using below commands,

keytool -export -alias myserver -file server.cer -keystore shrikIS.jks -storepass welcome1

keytool -import -alias server -trustcacerts -file server.cer -keystore shrikTS.jks

After this you will find another keystore shrikIS.jks is created in your directory.

Download keytool-iui from http://code.google.com/p/keytool-iui/ to see or manage your keystore in a GUI interface, its pretty cool one,here are the screenshots for mine,

image

image

6. Configure Weblogic Server

Now go the server tab of your weblogic console,

image

Click on Adminserver and keystore tab there after,

image

Change the keystore to Custom Identity and Custom Trust and provide the Identity store and trust store location with password. Give keystore type JKS.Now click the SSL tab and give the private key alias and password there,

image 

Here in the Advanced section select Hostname verification to none (in Prod don’t do that) and select Client Cert Requested But not Enforced in Two Way Client Cert Behavior: section dropdown list.

Then go the General tab and enable SSL port ,

image

Thant’s All ! you are almost set , secure all the managed server in same fashion.

Now restart the Server and try to open the console giving https and SSL port. You will find the certificate information in the browser,

image

You can view that certificate is issued to you and issued by getacert.

7. Configure Jdeveloper 11.1.1.5

Now you have to configure Jdeveloper to communicate with secured weblogic server.

For that open the jdev.conf file under <Jdev_Home>\jdeveloper\jdev\bin directory to check the Java location,

image

Now go to the <JDK_Folder>\jre\lib\security directory and copy your server.cer file here that you created in step 5.We need to import that to cacerts by below command

keytool -v -import -file server.cer -keystore cacerts

give the default password changeit.

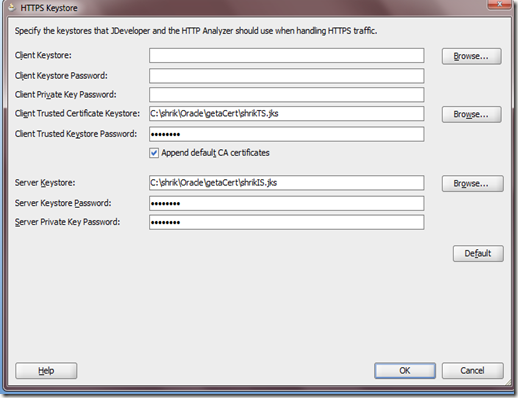
Now open the Jdev and go the preference section under Tool –>HTTP Analyzer –>HTTPS Setup.Here give the Identity and Trust store location and password as below,

image

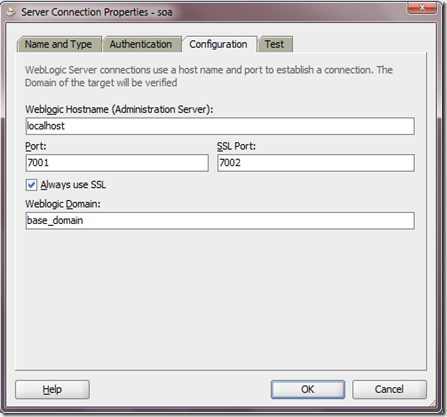
Now in the Appserver Connection in Resource Palette select your SOA server configuration and select Always use SSL as below and test the same.

image

You should get all success here and that completes the SOA Environment Security.